So installierst du das soziale Netzwerk Elgg auf Ubuntu 22.04
Elgg ist ein kostenloses, quelloffenes, hochgradig anpassbares Web-Framework und CMS für den Aufbau einer sozialen Online-Umgebung. Es ist in PHP geschrieben und nutzt MySQL als Datenbank-Backend. Es bietet ein einfaches, benutzerfreundliches und anpassbares Web-UI, das Anfängern hilft, Inhalte über einen Webbrowser zu erstellen und zu verwalten. Elgg ermöglicht es Schulen, Hochschulen und Universitäten, ihr soziales Umfeld auf dem Campus zu gestalten. Es ist eine der beliebtesten Social-Networking-Engines und bietet ein robustes Framework, auf dem du alle Arten von sozialen Umgebungen aufbauen kannst.
Dieser Beitrag zeigt dir, wie du Elgg mit Nginx und Let’s Encrypt SSL unter Ubuntu 22.04 installierst.
Voraussetzungen
- Ein Server, auf dem Ubuntu 22.04 läuft.
- Ein gültiger Domainname, der auf die IP deines Servers zeigt.
- Ein Root-Passwort ist auf dem Server konfiguriert.
Erste Schritte
Bevor du beginnst, solltest du die Systempakete auf die aktuelle Version aktualisieren. Du kannst alle Pakete aktualisieren, indem du den folgenden Befehl ausführst:
apt-get update -y
Nachdem du alle Pakete aktualisiert hast, kannst du mit dem nächsten Schritt fortfahren.
Nginx, PHP und MariaDB installieren
Zuerst musst du sicherstellen, dass Nginx, MariaDB, PHP und andere PHP-Erweiterungen in deinem System installiert sind. Wenn sie nicht installiert sind, kannst du sie mit dem folgenden Befehl installieren:
apt-get install nginx mariadb-server php php-cli php-fpm php-json php-pdo php-mysql php-zip php-gd php-mbstring php-curl php-xml php-pear php-bcmath unzip curl -y
Sobald alle Pakete installiert sind, bearbeite die Datei php.ini und ändere einige Standardeinstellungen:
nano /etc/php/8.1/fpm/php.ini
Ändere die folgenden Einstellungen entsprechend deinen Anforderungen:
memory_limit = 256M
post_max_size = 64M
upload_max_filesize = 32M
date.timezone = UTC
Speichere und schließe die Datei und starte dann den PHP-FPM-Dienst neu, um die Änderungen zu übernehmen:
systemctl restart php8.1-fpm
MariaDB-Datenbank konfigurieren
Als nächstes musst du eine Datenbank und einen Benutzer für Elgg erstellen. Melde dich dazu mit folgendem Befehl bei MySQL an:
mysql
Sobald du eingeloggt bist, erstelle eine Datenbank und einen Benutzer mit dem folgenden Befehl:
CREATE DATABASE elggdb;
CREATE USER elgguser@localhost IDENTIFIED BY 'securepassword';
Als Nächstes erteilst du der Elgg-Datenbank alle Rechte mit dem folgenden Befehl:
GRANT ALL PRIVILEGES ON elggdb.* TO elgguser@localhost;
Als Nächstes löschst du die Berechtigungen und beendest MySQL mit dem folgenden Befehl:
FLUSH PRIVILEGES;
EXIT;
Jetzt sind die MariaDB-Datenbank und der Benutzer für Elgg erstellt. Du kannst nun mit dem nächsten Schritt fortfahren.
Elgg Ubuntu 22.04 installieren
Als nächstes musst du die neueste Version von Elgg von der Github-Website herunterladen. Du kannst sie mit dem folgenden Befehl herunterladen:
wget https://github.com/Elgg/Elgg/releases/download/4.2.3/elgg-4.2.3.zip
Sobald der Download abgeschlossen ist, entpackst du die heruntergeladene Datei mit dem folgenden Befehl:
unzip elgg-*.zip
Als Nächstes verschiebst du das entpackte Verzeichnis mit folgendem Befehl in das Nginx-Web-Root-Verzeichnis:
mv elgg-4.2.3 /var/www/html/elgg
Als Nächstes erstellst du ein Datenverzeichnis für Elgg und legst die Eigentumsrechte für das Datenverzeichnis und das Elgg-Verzeichnis fest:
mkdir /var/www/html/data
chown -R www-data:www-data /var/www/html/elgg/
chown -R www-data:www-data /var/www/html/data
chmod -R 755 /var/www/html/elgg
Jetzt wird Elgg in das Nginx-Web-Root-Verzeichnis heruntergeladen. Du kannst nun mit dem nächsten Schritt fortfahren.
Einen virtuellen Nginx-Host für Elgg erstellen
Als Nächstes musst du eine Konfigurationsdatei für einen virtuellen Nginx-Host erstellen, um Elgg im Internet zu hosten. Du kannst sie mit dem folgenden Befehl erstellen:
nano /etc/nginx/conf.d/elgg.conf
Füge die folgenden Zeilen hinzu:
server {
  listen 80;

  server_name elgg.example.com;
  root /var/www/html/elgg;

  index index.php;

  access_log /var/log/nginx/elgg_access.log;
  error_log /var/log/nginx/elgg_error.log;

  location / {
    try_files $uri $uri/ /index.php?$query_string;
  }

  location ~ \.php$ {
    fastcgi_index index.php;
    fastcgi_split_path_info ^(.+\.php)(.*)$;
    fastcgi_keep_conn on;
    fastcgi_pass unix:/var/run/php/php8.1-fpm.sock;
    include /etc/nginx/fastcgi_params;
    fastcgi_param SCRIPT_FILENAME $document_root$fastcgi_script_name;
  }
}
Speichere und schließe die Datei, dann überprüfe Nginx auf Syntaxfehler:
nginx -t
Du solltest die folgende Ausgabe sehen:
nginx: the configuration file /etc/nginx/nginx.conf syntax is ok
nginx: configuration file /etc/nginx/nginx.conf test is successful
Starte dann den Nginx-Dienst mit folgendem Befehl neu:
systemctl restart nginx
Du kannst den Status des Nginx-Dienstes mit dem folgenden Befehl überprüfen:
systemctl status nginx
Du solltest die folgende Ausgabe sehen:
? nginx.service - A high performance web server and a reverse proxy server
     Loaded: loaded (/lib/systemd/system/nginx.service; enabled; vendor preset: enabled)
     Active: active (running) since Mon 2022-07-18 05:53:15 UTC; 6s ago
       Docs: man:nginx(8)
    Process: 18028 ExecStartPre=/usr/sbin/nginx -t -q -g daemon on; master_process on; (code=exited, status=0/SUCCESS)
    Process: 18029 ExecStart=/usr/sbin/nginx -g daemon on; master_process on; (code=exited, status=0/SUCCESS)
   Main PID: 18031 (nginx)
      Tasks: 3 (limit: 4579)
     Memory: 3.3M
        CPU: 53ms
     CGroup: /system.slice/nginx.service
             ??18031 "nginx: master process /usr/sbin/nginx -g daemon on; master_process on;"
             ??18032 "nginx: worker process" "" "" "" "" "" "" "" "" "" "" "" "" "" "" "" "" "" "" "" "" "" "" "" "" "" "" ""
             ??18033 "nginx: worker process" "" "" "" "" "" "" "" "" "" "" "" "" "" "" "" "" "" "" "" "" "" "" "" "" "" "" ""

Jul 18 05:53:15 ubuntu2204 systemd[1]: Starting A high performance web server and a reverse proxy server...
Jul 18 05:53:15 ubuntu2204 systemd[1]: Started A high performance web server and a reverse proxy server.
Zugriff auf das Elgg Web Interface
Elgg ist nun installiert und mit Nginx konfiguriert. Öffne nun deinen Webbrowser und rufe die Elgg-Weboberfläche über die URL http://elgg.example.com auf. Du wirst zur Begrüßungsseite von Elgg weitergeleitet:
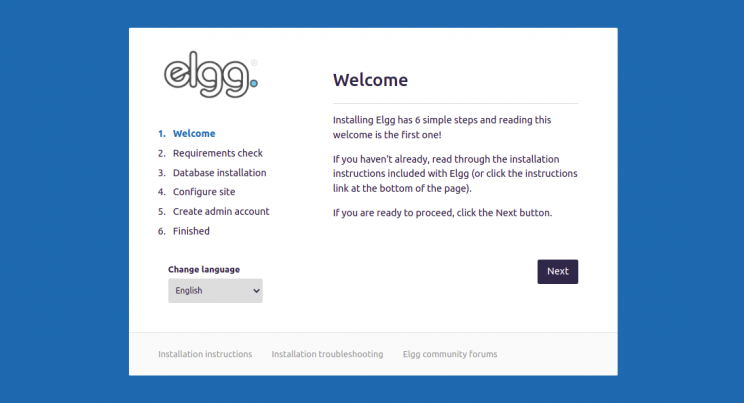
Klicke auf die Schaltfläche Weiter. Du solltest die Seite zur Überprüfung der PHP-Anforderungen sehen:

Vergewissere dich, dass alle Anforderungen installiert sind, und klicke dann auf die Schaltfläche Weiter. Du solltest die Seite für die Datenbankkonfiguration sehen:
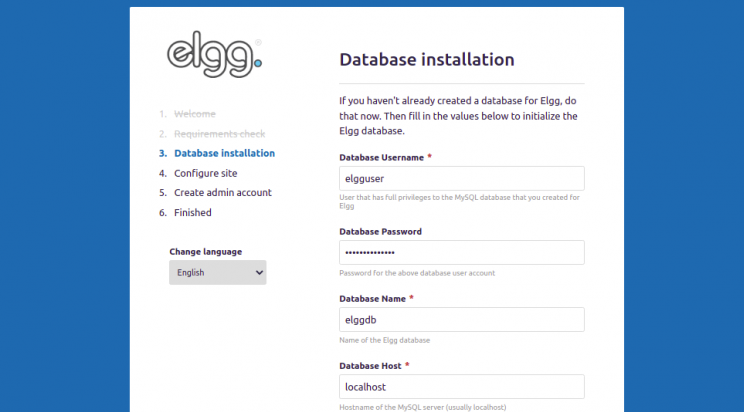
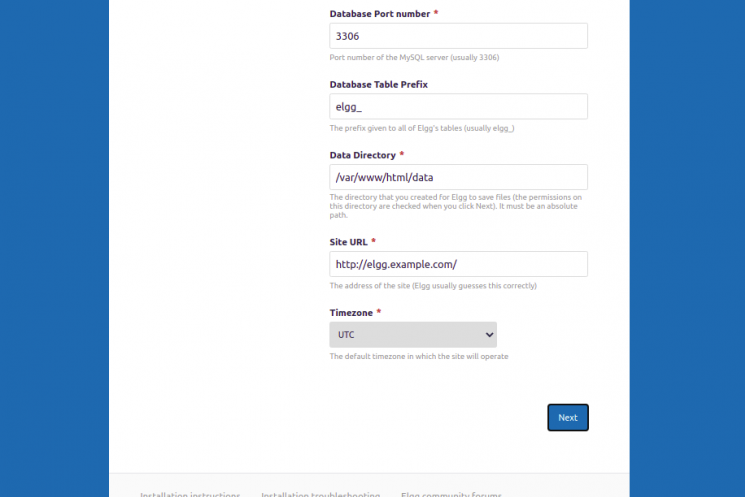
Gib deine Datenbankinformationen, das Datenverzeichnis und die URL der Website an und klicke auf die Schaltfläche Weiter. Du solltest die Seite für die Website-Konfiguration sehen:
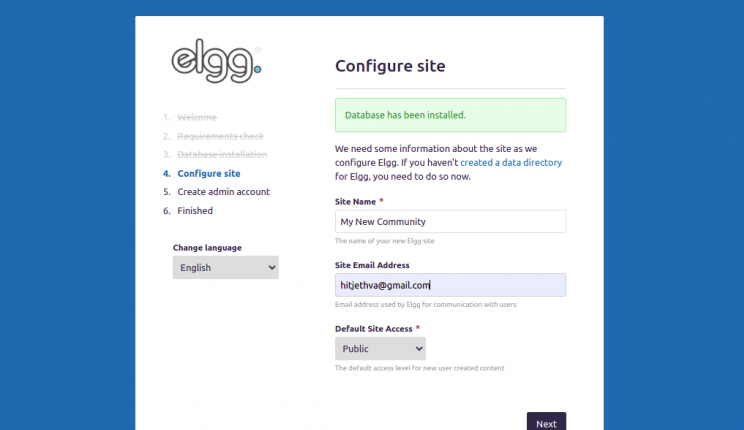
Gib die Informationen zu deiner Website ein und klicke auf die Schaltfläche Weiter. Du solltest die Seite zum Anlegen eines Elgg-Admin-Benutzers sehen:
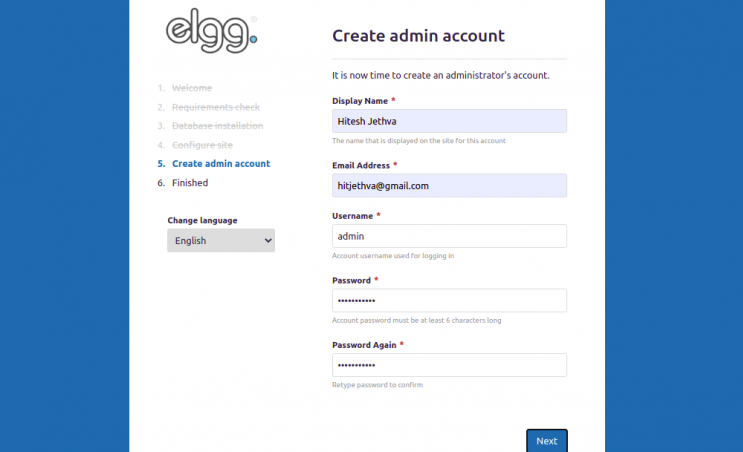
Gib deinen Admin-Benutzernamen, deine E-Mail-Adresse und dein Passwort ein und klicke auf die Schaltfläche Weiter. Wenn die Installation erfolgreich abgeschlossen wurde, solltest du die folgende Seite sehen:
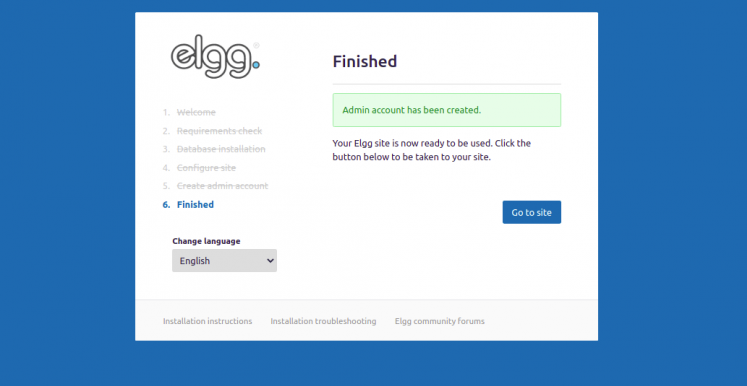
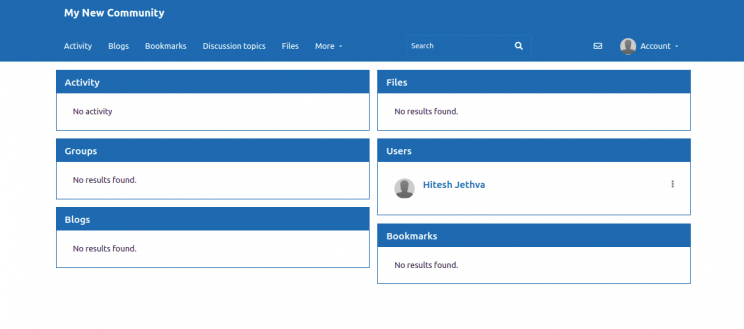
Klicke auf Go to site. Auf der folgenden Seite solltest du das Elgg Dashboard sehen:
Let’s Encrypt SSL auf Elgg aktivieren
Es ist immer eine gute Idee, deine Website mit Let’s Encrypt SSL zu sichern. Installiere zuerst den Certbot Let’s Encrypt Client auf deinem Server mit dem folgenden Befehl:
apt-get install python3-certbot-nginx -y
Sobald Certbot installiert ist, sichere deine Website mit Let’s Encrypt SSL, indem du den folgenden Befehl ausführst:
certbot --nginx -d elgg.example.com
Du wirst aufgefordert, eine gültige E-Mail-Adresse anzugeben und die Nutzungsbedingungen zu akzeptieren (siehe unten):
Saving debug log to /var/log/letsencrypt/letsencrypt.log
Plugins selected: Authenticator nginx, Installer nginx
Enter email address (used for urgent renewal and security notices) (Enter 'c' to
cancel): hitjethva@gmail.com

- - - - - - - - - - - - - - - - - - - - - - - - - - - - - - - - - - - - - - - -
Please read the Terms of Service at
https://letsencrypt.org/documents/LE-SA-v1.2-November-15-2017.pdf. You must
agree in order to register with the ACME server at
https://acme-v02.api.letsencrypt.org/directory
- - - - - - - - - - - - - - - - - - - - - - - - - - - - - - - - - - - - - - - -
(A)gree/(C)ancel: A

- - - - - - - - - - - - - - - - - - - - - - - - - - - - - - - - - - - - - - - -
Would you be willing to share your email address with the Electronic Frontier
Foundation, a founding partner of the Let's Encrypt project and the non-profit
organization that develops Certbot? We'd like to send you email about our work
encrypting the web, EFF news, campaigns, and ways to support digital freedom.
- - - - - - - - - - - - - - - - - - - - - - - - - - - - - - - - - - - - - - - -
(Y)es/(N)o: Y
Obtaining a new certificate
Performing the following challenges:
http-01 challenge for elgg.example.com
Waiting for verification...
Cleaning up challenges
Deploying Certificate to VirtualHost /etc/nginx/conf.d/elgg.conf
Als Nächstes wählst du aus, ob der HTTP-Datenverkehr auf HTTPS umgeleitet werden soll oder nicht (siehe unten):
- - - - - - - - - - - - - - - - - - - - - - - - - - - - - - - - - - - - - - - -
1: No redirect - Make no further changes to the webserver configuration.
2: Redirect - Make all requests redirect to secure HTTPS access. Choose this for
new sites, or if you're confident your site works on HTTPS. You can undo this
change by editing your web server's configuration.
- - - - - - - - - - - - - - - - - - - - - - - - - - - - - - - - - - - - - - - -
Select the appropriate number [1-2] then [enter] (press 'c' to cancel): 2
Gib 2 ein und drücke die Eingabetaste, um die Installation abzuschließen. Du solltest die folgende Ausgabe sehen:
Redirecting all traffic on port 80 to ssl in /etc/nginx/conf.d/elgg.conf

- - - - - - - - - - - - - - - - - - - - - - - - - - - - - - - - - - - - - - - -
Congratulations! You have successfully enabled https://elgg.example.com

You should test your configuration at:
https://www.ssllabs.com/ssltest/analyze.html?d=elgg.example.com
- - - - - - - - - - - - - - - - - - - - - - - - - - - - - - - - - - - - - - - -

IMPORTANT NOTES:
 - Congratulations! Your certificate and chain have been saved at:
   /etc/letsencrypt/live/elgg.example.com/fullchain.pem
   Your key file has been saved at:
   /etc/letsencrypt/live/elgg.example.com/privkey.pem
   Your cert will expire on 2022-10-19. To obtain a new or tweaked
   version of this certificate in the future, simply run certbot again
   with the "certonly" option. To non-interactively renew *all* of
   your certificates, run "certbot renew"
 - Your account credentials have been saved in your Certbot
   configuration directory at /etc/letsencrypt. You should make a
   secure backup of this folder now. This configuration directory will
   also contain certificates and private keys obtained by Certbot so
   making regular backups of this folder is ideal.
 - If you like Certbot, please consider supporting our work by:

   Donating to ISRG / Let's Encrypt:   https://letsencrypt.org/donate
   Donating to EFF:                    https://eff.org/donate-le

 - We were unable to subscribe you the EFF mailing list because your
   e-mail address appears to be invalid. You can try again later by
   visiting https://act.eff.org.
Fazit
Herzlichen Glückwunsch! Du hast Elgg erfolgreich mit Nginx und Let’s Encrypt SSL auf Ubuntu 22.04 installiert. Jetzt kannst du Elgg in deiner Schule, Hochschule oder Universität installieren und deine eigene Social-Networking-Plattform einrichten. Wenn du noch Fragen hast, kannst du dich gerne an mich wenden.