Wie man Drupal mit Apache und Let’s Encrypt SSL unter Debian 11 installiert
Drupal ist ein kostenloses und quelloffenes Content-Management-System, das auf dem LAMP-Stack basiert. Drupal verfügt über großartige Standardfunktionen, mit denen du leistungsstarke Websites und Blogs erstellen kannst. Es wird mit einer Vielzahl von Themes, Plugins und Widgets geliefert, mit denen du auch ohne Programmierkenntnisse eine Website erstellen kannst. Es bietet viele Funktionen wie Multi-Site-Unterstützung, Unterstützung für mehrere Sprachen, Kommentarsystem, RSS-Feed, Benutzerregistrierung und vieles mehr.
In diesem Beitrag zeigen wir dir, wie du Drupal CMS mit Apache und Let’s Encrypt SSL unter Debian 11 installierst.
Voraussetzungen
- Ein Server, auf dem Debian 11 läuft.
- Ein gültiger Domainname, der auf die IP deines Servers zeigt.
- Ein Root-Passwort ist auf dem Server konfiguriert.
LAMP-Stack installieren
Drupal basiert auf dem LAMP-Stack. Daher muss der LAMP-Stack auf deinem Server installiert sein. Wenn er nicht installiert ist, kannst du ihn mit folgendem Befehl installieren:
apt-get install apache2 mariadb-server mariadb-client php libapache2-mod-php php-cli php-mysql php-zip php-gd php-fpm php-json php-common php-intl php-mbstring php-curl php-xml php-pear php-tidy php-soap php-bcmath php-xmlrpc -y
Sobald der LAMP-Stack installiert ist, bearbeite die Datei php.ini und ändere einige Standardeinstellungen:
nano /etc/php/7.4/apache2/php.ini
Ändere die folgenden Zeilen:
memory_limit = 256M
upload_max_filesize = 32M
max_execution_time = 300
date.timezone = Asia/Kolkata
Speichere und schließe die Datei, wenn du fertig bist.
Eine Drupal-Datenbank erstellen
Drupal verwendet MariaDB als Datenbank-Backend. Du musst also eine Datenbank und einen Benutzer für Drupal erstellen.
Melde dich zunächst mit folgendem Befehl bei MariaDB an:
mysql
Sobald du eingeloggt bist, erstelle eine Datenbank und einen Benutzer mit dem folgenden Befehl:
MariaDB [(none)]> CREATE DATABASE drupaldb;
MariaDB [(none)]> CREATE USER 'drupaluser'@'localhost' IDENTIFIED BY "securepassword";
Als Nächstes erteilst du der Drupal-Datenbank mit folgendem Befehl alle Berechtigungen:
MariaDB [(none)]> GRANT ALL ON drupaldb.* TO 'drupaluser'@'localhost' IDENTIFIED BY "securepassword";
Lösche die Berechtigungen und verlasse MariaDB mit folgendem Befehl:
MariaDB [(none)]> FLUSH PRIVILEGES;
MariaDB [(none)]> EXIT;
Drupal herunterladen
Gehe zunächst auf die Drupal-Website und lade die neueste Version von Drupal mit folgendem Befehl herunter:
wget https://www.drupal.org/download-latest/tar.gz -O drupal.tar.gz
Sobald Drupal heruntergeladen ist, entpackst du die heruntergeladene Datei mit dem folgenden Befehl:
tar -xvf drupal.tar.gz
Als Nächstes verschiebst du das entpackte Verzeichnis in das Apache-Standard-Stammverzeichnis:
mv drupal-* /var/www/html/drupal
Als Nächstes änderst du mit folgendem Befehl die Eigentums- und Zugriffsrechte für das Drupal-Verzeichnis:
chown -R www-data:www-data /var/www/html/drupal/
chmod -R 755 /var/www/html/drupal/
Einen virtuellen Apache-Host für Drupal erstellen
Als Nächstes musst du eine Konfigurationsdatei für einen virtuellen Apache-Host erstellen, um Drupal zu hosten. Du kannst sie mit dem folgenden Befehl erstellen:
nano /etc/apache2/sites-available/drupal.conf
Füge die folgenden Zeilen hinzu:
<VirtualHost *:80>
     ServerAdmin admin@example.com
     DocumentRoot /var/www/html/drupal/
     ServerName  drupal.example.com

     ErrorLog ${APACHE_LOG_DIR}/error.log
     CustomLog ${APACHE_LOG_DIR}/access.log combined

     <Directory /var/www/html/drupal/>
            Options FollowSymlinks
            AllowOverride All
            Require all granted
     </Directory>

     <Directory /var/www/html/>
            RewriteEngine on
            RewriteBase /
            RewriteCond %{REQUEST_FILENAME} !-f
            RewriteCond %{REQUEST_FILENAME} !-d
            RewriteRule ^(.*)$ index.php?q=$1 [L,QSA]
    </Directory>
</VirtualHost>
Speichere und schließe die Datei und aktiviere den virtuellen Host für Drupal und das Apache Rewrite-Modul mit folgendem Befehl:
a2ensite drupal.conf
a2enmod rewrite
Starte anschließend den Apache-Dienst neu, um die Änderungen zu übernehmen:
systemctl restart apache2
Um den Status des Apache zu überprüfen, führe den folgenden Befehl aus:
systemctl status apache2
Du solltest die folgende Ausgabe erhalten:
? apache2.service - The Apache HTTP Server
     Loaded: loaded (/lib/systemd/system/apache2.service; enabled; vendor preset: enabled)
     Active: active (running) since Sat 2021-09-18 14:59:40 UTC; 5s ago
       Docs: https://httpd.apache.org/docs/2.4/
    Process: 19698 ExecStart=/usr/sbin/apachectl start (code=exited, status=0/SUCCESS)
   Main PID: 19703 (apache2)
      Tasks: 6 (limit: 2341)
     Memory: 15.3M
        CPU: 78ms
     CGroup: /system.slice/apache2.service
             ??19703 /usr/sbin/apache2 -k start
             ??19704 /usr/sbin/apache2 -k start
             ??19705 /usr/sbin/apache2 -k start
             ??19706 /usr/sbin/apache2 -k start
             ??19707 /usr/sbin/apache2 -k start
             ??19708 /usr/sbin/apache2 -k start
Jetzt ist der Apache-Webserver so konfiguriert, dass er Drupal bedienen kann. Du kannst jetzt mit dem nächsten Schritt fortfahren.
Zugriff auf die Drupal-Website
Öffne nun deinen Webbrowser und rufe Drupal über die URL http://drupal.example.com auf. Du wirst auf die folgende Seite weitergeleitet:
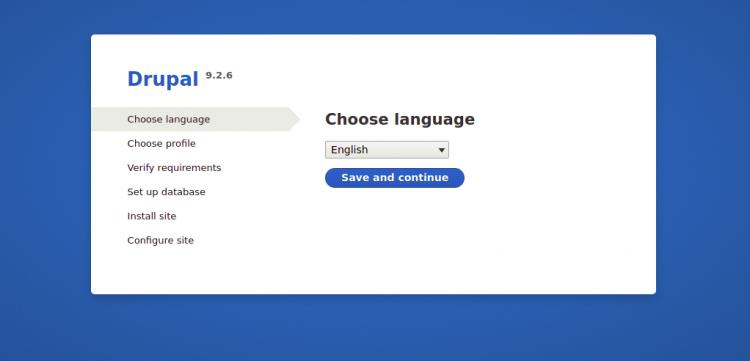
Wähle die englische Sprache und klicke auf die Schaltfläche Speichern und weiter:
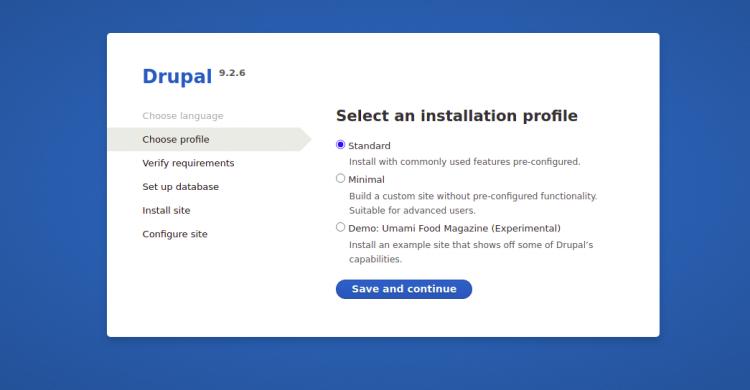
Wähle ein Installationsprofil und klicke auf die Schaltfläche Speichern und fort fahren. Du solltest die folgende Seite sehen:
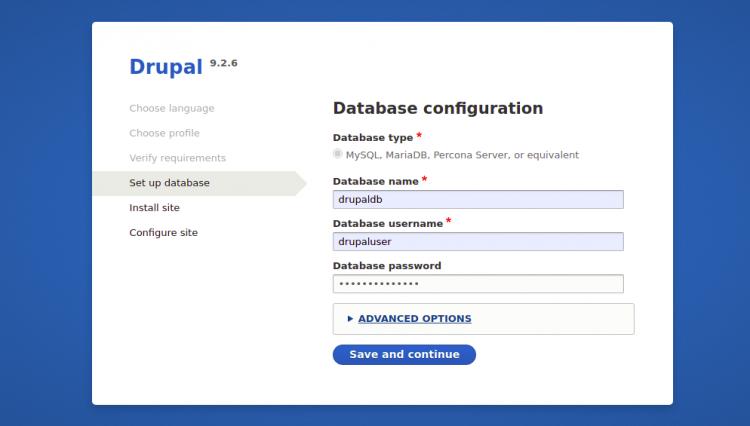
Auf der Seite Datenbankkonfiguration gibst du alle erforderlichen Datenbankdaten ein, wie z. B. den Datenbanknamen, den Benutzernamen und das Passwort der Datenbank sowie den Datenbank-Host, und klickst dann auf die Schaltfläche Speichern und Weiter:
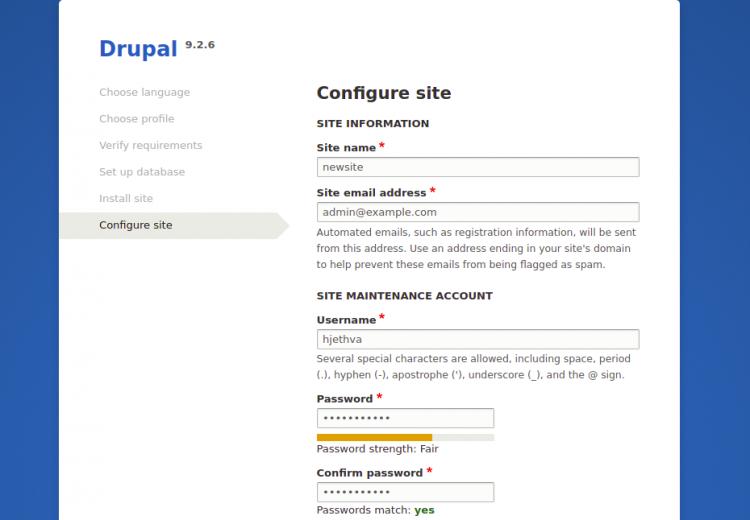
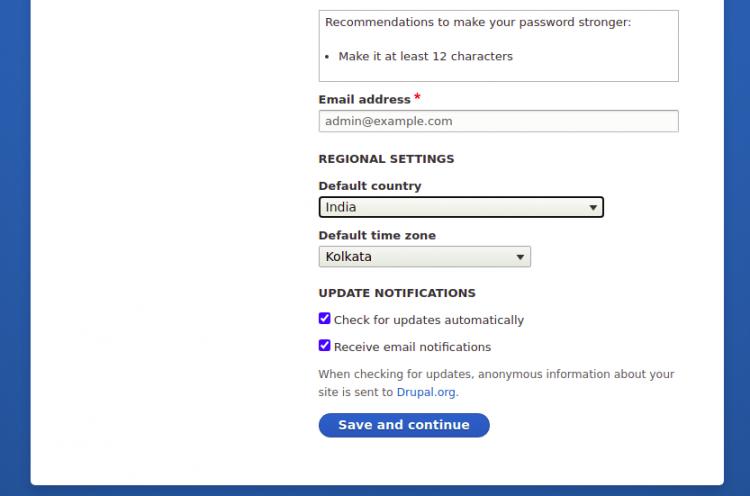
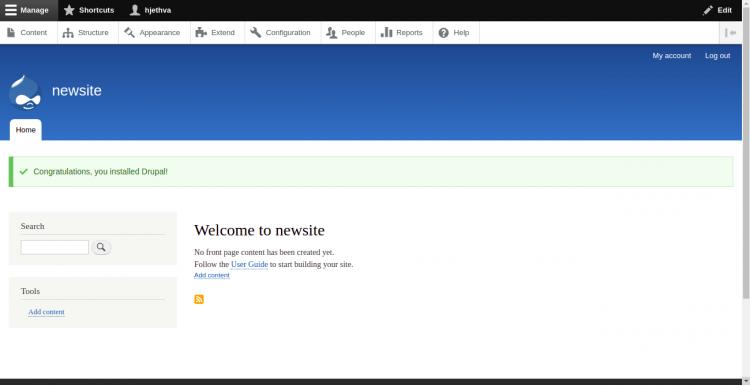
Auf der Seite Drupal-Site-Konfiguration gibst du deinen Site-Namen, deinen Admin-Benutzernamen und dein Passwort ein und klickst dann auf die Schaltfläche Speichern und Weiter, um die Installation von Drupal zu starten. Sobald Drupal installiert ist, solltest du das Drupal-Dashboard in der folgenden Abbildung sehen:
Let’s Encrypt SSL-Unterstützung auf der Drupal-Website aktivieren
Es ist immer eine gute Idee, deine Website mit Let’s Encrypt SSL zu sichern. Zunächst musst du den Certbot-Client installieren, um das SSL zu installieren und zu verwalten. Standardmäßig ist das Certbot-Paket im Standard-Repository von Debian 11 enthalten, sodass du es mit dem folgenden Befehl installieren kannst:
apt-get install python3-certbot-apache -y
Sobald Certbot installiert ist, führe den folgenden Befehl aus, um deine Website mit Let’s Encrypt SSL zu sichern:
certbot --apache -d drupal.example.com
Du wirst aufgefordert, deine E-Mail-Adresse anzugeben und die Nutzungsbedingungen zu akzeptieren (siehe unten):
Saving debug log to /var/log/letsencrypt/letsencrypt.log
Plugins selected: Authenticator standalone, Installer None
Enter email address (used for urgent renewal and security notices) (Enter 'c' to
cancel): hitjethva1981@gmail.com

- - - - - - - - - - - - - - - - - - - - - - - - - - - - - - - - - - - - - - - -
Please read the Terms of Service at
https://letsencrypt.org/documents/LE-SA-v1.2-November-15-2017.pdf. You must
agree in order to register with the ACME server at
https://acme-v02.api.letsencrypt.org/directory
- - - - - - - - - - - - - - - - - - - - - - - - - - - - - - - - - - - - - - - -
(A)gree/(C)ancel: A

- - - - - - - - - - - - - - - - - - - - - - - - - - - - - - - - - - - - - - - -
Would you be willing to share your email address with the Electronic Frontier
Foundation, a founding partner of the Let's Encrypt project and the non-profit
organization that develops Certbot? We'd like to send you email about our work
encrypting the web, EFF news, campaigns, and ways to support digital freedom.
- - - - - - - - - - - - - - - - - - - - - - - - - - - - - - - - - - - - - - - -
(Y)es/(N)o: Y
Plugins selected: Authenticator apache, Installer apache
Obtaining a new certificate
Performing the following challenges:
http-01 challenge for drupal.example.com
Enabled Apache rewrite module
Waiting for verification...
Cleaning up challenges
Created an SSL vhost at /etc/apache2/sites-available/drupal-le-ssl.conf
Enabled Apache socache_shmcb module
Enabled Apache ssl module
Deploying Certificate to VirtualHost /etc/apache2/sites-available/drupal-le-ssl.conf
Enabling available site: /etc/apache2/sites-available/drupal-le-ssl.conf
Als Nächstes wählst du aus, ob der HTTP-Verkehr auf HTTPS umgeleitet werden soll oder nicht (siehe unten):
Please choose whether or not to redirect HTTP traffic to HTTPS, removing HTTP access.
- - - - - - - - - - - - - - - - - - - - - - - - - - - - - - - - - - - - - - - -
1: No redirect - Make no further changes to the webserver configuration.
2: Redirect - Make all requests redirect to secure HTTPS access. Choose this for
new sites, or if you're confident your site works on HTTPS. You can undo this
change by editing your web server's configuration.
- - - - - - - - - - - - - - - - - - - - - - - - - - - - - - - - - - - - - - - -
Select the appropriate number [1-2] then [enter] (press 'c' to cancel): 2
Gib 2 ein und drücke die Eingabetaste, um Let’s Encrypt SSL für deine Website zu installieren:
Enabled Apache rewrite module
Redirecting vhost in /etc/apache2/sites-enabled/drupal.conf to ssl vhost in /etc/apache2/sites-available/drupal-le-ssl.conf

- - - - - - - - - - - - - - - - - - - - - - - - - - - - - - - - - - - - - - - -
Congratulations! You have successfully enabled https://drupal.example.com

You should test your configuration at:
https://www.ssllabs.com/ssltest/analyze.html?d=drupal.example.com
- - - - - - - - - - - - - - - - - - - - - - - - - - - - - - - - - - - - - - - -

IMPORTANT NOTES:
 - Congratulations! Your certificate and chain have been saved at:
   /etc/letsencrypt/live/drupal.example.com/fullchain.pem
   Your key file has been saved at:
   /etc/letsencrypt/live/drupal.example.com/privkey.pem
   Your cert will expire on 2021-04-20. To obtain a new or tweaked
   version of this certificate in the future, simply run certbot again
   with the "certonly" option. To non-interactively renew *all* of
   your certificates, run "certbot renew"
 - If you like Certbot, please consider supporting our work by:

   Donating to ISRG / Let's Encrypt:   https://letsencrypt.org/donate
   Donating to EFF:                    https://eff.org/donate-le
Fazit
Das war’s für den Moment. Du hast Drupal erfolgreich mit Let’s Encrypt SSL auf Debian 11 installiert. Jetzt kannst du auch ohne Programmierkenntnisse deinen eigenen Blog oder deine eigene Website erstellen. Wenn du noch Fragen hast, kannst du mich gerne fragen.