Samba 4 mit Active Directory auf CentOS 7 – rpm basierte Installation mit Share-Unterstützung
In diesem Tutorial werde ich SAMBA mit AD Unterstützung unter Verwendung von Paketen aus dem Wing Repository installieren. Weiterhin werde ich zeigen wie man eine Samba-Freigabe erstellt. Es wird ein CentOS 7-Server mit einer minimalen Installation als Basis verwendet mit aktiviertem SELinux.
Vorbereiten des CentOS 7 Servers
Überprüfen Sie den SELinux-Status.
[root@samba4 ~]# sestatus
SELinux status:                 enabled
SELinuxfs mount:                /sys/fs/selinux
SELinux root directory:         /etc/selinux
Loaded policy name:             targeted
Current mode:                   enforcing
Mode from config file:          enforcing
Policy MLS status:              enabled
Policy deny_unknown status:     allowed
Max kernel policy version:      28
[root@samba4 ~]#
Machen Sie einen Eintrag in der Hostdatei mit der Server-IP-Adresse, gefolgt vom vollständigen (fqdn) Hostnamen und dann dem lokalen Teil des Hostnamens.
[root@samba4 ~]# cat /etc/hosts
127.0.0.1   localhost localhost.localdomain localhost4 localhost4.localdomain4
::1         localhost localhost.localdomain localhost6 localhost6.localdomain6
192.168.1.190   samba4.sunil.cc samba4
[root@samba4 ~]#
Installieren Sie das Epel CentOS-Repository.
[root@samba4 ~]# yum install epel-release -y
Installieren Sie die Basispakete.
[root@samba4 ~]# yum install vim wget authconfig krb5-workstation -y
Montieren Sie nun das Flügel-Repo.
[root@samba4 ~]# cd /etc/yum.repos.d/
[root@samba4 yum.repos.d]# wget http://wing-net.ddo.jp/wing/7/EL7.wing.repo
[root@samba4 yum.repos.d]# sed -i 's@enabled=0@enabled=1@g' /etc/yum.repos.d/EL7.wing.repo
[root@samba4 yum.repos.d]# yum clean all
Loaded plugins: fastestmirror
Cleaning repos: base extras updates wing wing-source
Cleaning up everything
Cleaning up list of fastest mirrors
[root@samba4 yum.repos.d]#
Samba 4 auf CentOS 7 installieren
Installation der Samba4-Pakete aus dem Wing-Repository mit yum.
[root@samba4 yum.repos.d]# yum install -y samba45 samba45-winbind-clients samba45-winbind samba45-client\
samba45-dc samba45-pidl samba45-python samba45-winbind-krb5-locator perl-Parse-Yapp\
perl-Test-Base python2-crypto samba45-common-tools
Entfernen Sie diese Dateien.
[root@samba4 ~]# rm -rf /etc/krb5.conf
[root@samba4 ~]# rm -rf /etc/samba/smb.conf
Samba 4 Konfiguration
Nun werden wir die Domain-Bereitstellung vornehmen.
[root@samba4 ~]# samba-tool domain provision --use-rfc2307 --interactive
 Realm [SUNIL.CC]:
 Domain [SUNIL]:
 Server Role (dc, member, standalone) [dc]:
 DNS backend (SAMBA_INTERNAL, BIND9_FLATFILE, BIND9_DLZ, NONE) [SAMBA_INTERNAL]:
 DNS forwarder IP address (write 'none' to disable forwarding) [4.2.2.1]:
Administrator password:
Retype password:
Looking up IPv4 addresses
Looking up IPv6 addresses
No IPv6 address will be assigned
Setting up secrets.ldb
Setting up the registry
Setting up the privileges database
Setting up idmap db
Setting up SAM db
Setting up sam.ldb partitions and settings
Setting up sam.ldb rootDSE
Pre-loading the Samba 4 and AD schema
Adding DomainDN: DC=sunil,DC=cc
Adding configuration container
Setting up sam.ldb schema
Setting up sam.ldb configuration data
Setting up display specifiers
Modifying display specifiers
Adding users container
Modifying users container
Adding computers container
Modifying computers container
Setting up sam.ldb data
Setting up well known security principals
Setting up sam.ldb users and groups
Setting up self join
Adding DNS accounts
Creating CN=MicrosoftDNS,CN=System,DC=sunil,DC=cc
Creating DomainDnsZones and ForestDnsZones partitions
Populating DomainDnsZones and ForestDnsZones partitions
Setting up sam.ldb rootDSE marking as synchronized
Fixing provision GUIDs
A Kerberos configuration suitable for Samba 4 has been generated at /var/lib/samba/private/krb5.conf
Setting up fake yp server settings
Once the above files are installed, your Samba4 server will be ready to use
Server Role:           active directory domain controller
Hostname:              samba4
NetBIOS Domain:        SUNIL
DNS Domain:            sunil.cc
DOMAIN SID:            S-1-5-21-1578983437-3114190590-2362936743
[root@samba4 etc]#
Stellen Sie sicher, dass die Ports in der Firewall geöffnet sind.
[root@samba4 etc]#firewall-cmd --add-port=53/tcp --permanent;firewall-cmd --add-port=53/udp --permanent;firewall-cmd --add-port=88/tcp --permanent;firewall-cmd --add-port=88/udp --permanent; \
firewall-cmd --add-port=135/tcp --permanent;firewall-cmd --add-port=137-138/udp --permanent;firewall-cmd --add-port=139/tcp --permanent; \
firewall-cmd --add-port=389/tcp --permanent;firewall-cmd --add-port=389/udp --permanent;firewall-cmd --add-port=445/tcp --permanent; \
firewall-cmd --add-port=464/tcp --permanent;firewall-cmd --add-port=464/udp --permanent;firewall-cmd --add-port=636/tcp --permanent; \
firewall-cmd --add-port=1024-3500/tcp --permanent;firewall-cmd --add-port=3268-3269/tcp --permanent
[root@samba4 ~]# firewall-cmd --reload
Das Paket enthält das Initskript nicht, wir werden es jetzt hinzufügen.
[root@samba4 ~]# cat  /etc/systemd/system/samba.service
[Unit]
Description= Samba 4 Active Directory
After=syslog.target
After=network.target

[Service]
Type=forking
PIDFile=/var/run/samba.pid
ExecStart=/usr/sbin/samba

[Install]
WantedBy=multi-user.target
[root@samba4 ~]#
[root@samba4 ~]# systemctl enable samba
Created symlink from /etc/systemd/system/multi-user.target.wants/samba.service to /etc/systemd/system/samba.service.
[root@samba4 ~]# systemctl restart samba
Erstellung der Samba-Freigabe mit Windows ACL-Unterstützung
Wir müssen die erweiterte ACL für samba4 konfigurieren. Füge folgendes in der Datei smb.conf unter global hinzu.
[root@samba4 ~]# cat /etc/samba/smb.conf
# Global parameters
[global]
        ------------
		-------------
        vfs objects = acl_xattr
        map acl inherit = yes
        store dos attributes = yes
		------------
		-------------

[root@samba4 ~]#
Starten Sie nun den Samba-Dienst neu.
[root@samba4 ~]# systemctl restart samba
Nur Benutzer und Gruppen, denen das SeDiskOperatorPrivilege-Privileg gewährt wurde, können Freigabeberechtigungen konfigurieren.
[root@samba4 ~]# net rpc rights grant "SUNIL\Domain Admins" SeDiskOperatorPrivilege -U "USER\administrator"
Enter USER\administrator's password:
Successfully granted rights.
[root@samba4 ~]#
Bevor wir die Freigabe erstellen, müssen wir sicherstellen, dass sich der samba4-Server mit sich selbst authentifiziert.
Wir können die übliche Methode nicht anwenden, da es nicht funktioniert, da das bestehende Paket vom Flügel mit den von RedHat gelieferten Paketen kollidiert, wir können sssd hier nicht verwenden. winbind wird verwendet, um dies zum Laufen zu bringen.
Bitte verwenden Sie die folgende Methode. Dies ist erforderlich, um die Samba-Freigabe mit bestimmten Berechtigungen zu erstellen.
Installieren Sie das folgende Paket.
[root@samba4 ~]#yum -y install authconfig-gtk*
Führen Sie den Befehl aus.
[root@samba4 yum.repos.d]# authconfig-tui
Bitte wählen Sie die Windbindung aus, folgen Sie den nächsten Schritten.

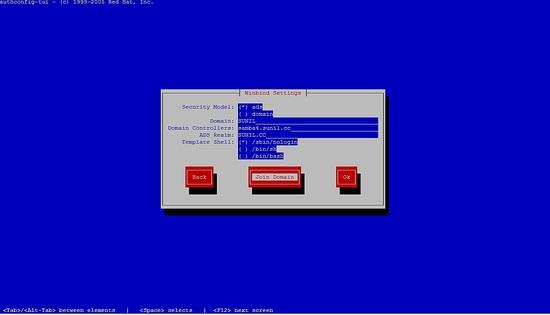
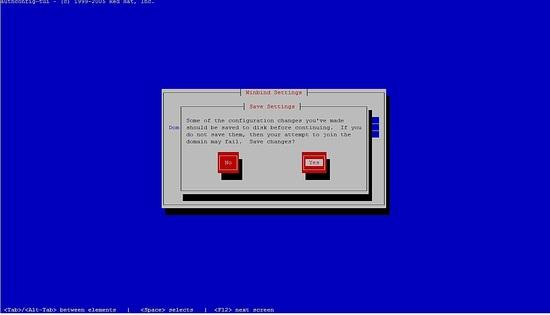
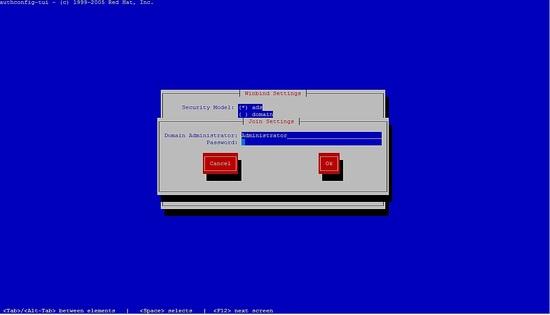
Sie können das Passwort nicht eingeben, drücken Sie einfach auf OK.
Dann kommentieren Sie Zeilen in /etc/samba/smb.conf aus und starten Sie den Samba-Dienst neu.
Ihre Konfiguration sollte wie folgt aussehen:
[root@samba4 ~]# cat /etc/samba/smb.conf
# Global parameters
[global]
#--authconfig--start-line--

# Generated by authconfig on 2017/05/26 17:23:04
# DO NOT EDIT THIS SECTION (delimited by --start-line--/--end-line--)
# Any modification may be deleted or altered by authconfig in future

#   workgroup = SUNIL
#   password server = samba4.sunil.cc
#   realm = SUNIL.CC
#   security = ads
#   idmap config * : range = 16777216-33554431
#   template shell = /sbin/nologin
#  kerberos method = secrets only
#   winbind use default domain = false
#   winbind offline logon = false

#--authconfig--end-line--
        netbios name = SAMBA4
        realm = SUNIL.CC
        workgroup = SUNIL
        dns forwarder = 4.2.2.1
        server role = active directory domain controller
        idmap_ldb:use rfc2307 = yes
        vfs objects = acl_xattr
        map acl inherit = yes
        store dos attributes = yes

[netlogon]
        path = /var/lib/samba/sysvol/sunil.cc/scripts
        read only = No

[sysvol]
        path = /var/lib/samba/sysvol
        read only = No
[root@samba4 ~]#
[root@samba4 ~]# systemctl restart samba
Überprüfen Sie, ob wir die Benutzer und Gruppen besetzen können:
[root@samba4 ~]# wbinfo -u
SUNIL\administrator
SUNIL\sambauser
SUNIL\testuser
SUNIL\krbtgt
SUNIL\guest
[root@samba4 ~]# wbinfo -g
SUNIL\cert publishers
SUNIL\ras and ias servers
SUNIL\allowed rodc password replication group
SUNIL\denied rodc password replication group
SUNIL\dnsadmins
SUNIL\enterprise read-only domain controllers
SUNIL\domain admins
SUNIL\domain users
SUNIL\domain guests
SUNIL\domain computers
SUNIL\domain controllers
SUNIL\schema admins
SUNIL\enterprise admins
SUNIL\group policy creator owners
SUNIL\read-only domain controllers
SUNIL\dnsupdateproxy
[root@samba4 ~]#
Ändern Sie die Zeilen in der nsswitch.conf:
[root@samba4 ~]# cat /etc/nsswitch.conf
----------
---------
passwd:     files winbind
shadow:     files winbind
group:      files winbind
hosts:      files dns wins
services:   files winbind
netgroup:   files winbind

---------
----------
Überprüfen Sie nun, ob wir den Benutzernamen mit dem Befehl id erhalten können:
[root@samba4 ~]# id testuser
uid=3000019(SUNIL\testuser) gid=100(users) groups=100(users),3000019(SUNIL\testuser),3000009(BUILTIN\users)
[root@samba4 ~]#
Erstellen einer Samba-Freigabe
Ich werde zwei Freigaben erstellen, eine, die nur für Testbenutzer zugänglich ist und die andere, die für alle Benutzer der Domänenbenutzergruppe zugänglich ist.
Die Freigabe, auf die der Tester zugreifen kann, wird als Testshare bezeichnet.
Die Freigabe, auf die alle Benutzer Zugriff haben, wird als Commonshare bezeichnet.
[root@samba4 ~]# mkdir /testshare
[root@samba4 ~]# mkdir /commonshare
[root@samba4 ~]# chmod 770 /testshare
[root@samba4 ~]# chmod 770 /commonshare
[root@samba4 ~]# chown -R root:testuser /testshare
[root@samba4 ~]# chown -R root:"Domain Users" /commonshare
Füge nun die Einträge in der smb.conf hinzu.
[root@samba4 ~]# cat /etc/samba/smb.conf
# Global parameters
[global]
        netbios name = SAMBA4
        realm = SUNIL.CC
        workgroup = SUNIL
        dns forwarder = 4.2.2.1
        server role = active directory domain controller
        idmap_ldb:use rfc2307 = yes
        vfs objects = acl_xattr
        map acl inherit = yes
        store dos attributes = yes

[netlogon]
        path = /var/lib/samba/sysvol/sunil.cc/scripts
        read only = No

[sysvol]
        path = /var/lib/samba/sysvol
        read only = No
[TestShare]
        comment = Test share accessible by testuser
        path = /testshare
        valid users = SUNIL\testuser
        writable = yes
        read only = no
        force create mode = 0660
        create mask = 0770
        directory mask = 0770
        force directory mode = 0770
        access based share enum = yes
        hide unreadable = yes
[CommonShare]
         comment = Accessible by all the users
          path = /commonshare
          valid users = "@SUNIL\Domain Users"
          writable = yes
        read only = no
        force create mode = 0660
        create mask = 0777
        directory mask = 0777
        force directory mode = 0770
        access based share enum = yes
        hide unreadable = yes
[root@samba4 ~]#
Starten Sie den Samba-Dienst neu.
[root@samba4 ~]# systemctl restart samba
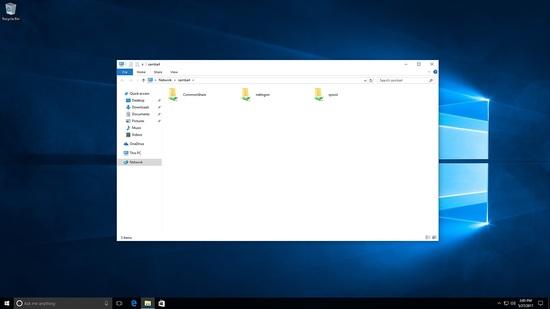
Greifen Sie als Testbenutzer auf die Samba-Freigabe zu.
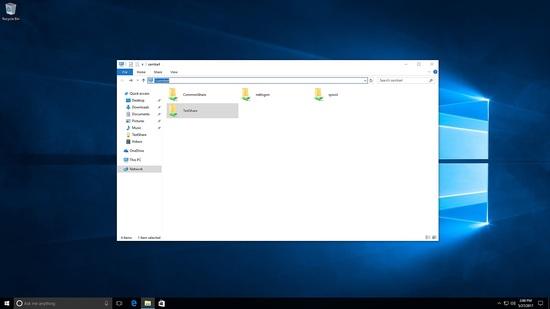
Hier sehen Sie, dass sowohl Testshare als auch Commonshare sichtbar sind.
Geprüftes Erstellen von Dateien und Ordnern unter test share.

[root@samba4 /]# cd /testshare/
[root@samba4 testshare]# ls -l
total 8
-rwxrwx---+ 1 SUNIL\testuser users 0 May 27 22:56 1.txt
drwxrwx---+ 2 SUNIL\testuser users 6 May 27 22:56 test
[root@samba4 testshare]#
Jetzt melde ich mich mit einem anderen Benutzer an, nur Commonshare ist sichtbar:
Erstellen von Dateien unter Commonshare.
[root@samba4 commonshare]# ls -l
total 8
drwxrwxrwx+ 2 SUNIL\testuser  users 6 May 27 23:02 test
drwxrwxrwx+ 2 SUNIL\sambauser users 6 May 27 23:07 test2
[root@samba4 commonshare]#
So erstellen wir Freigaben unter Samba 4.