Wie man das Ionic Framework auf Debian 10 installiert
Ionic ist ein freies und quelloffenes Framework für die Erstellung hochwertiger, plattformübergreifender nativer und Web-Apps. Es kommt mit einer leistungsstarken Kommandozeilen-Schnittstelle, die dir hilft, ein Projekt aus einem einfachen Befehl zu erstellen. Ionic unterstützt Android, IOS und die Universal Windows Platform für die Entwicklung von Apps. Ionic verwendet Cardova Plugins, um auf Kamera, GPS und Flashlight zuzugreifen.
In diesem Beitrag zeigen wir dir, wie du das Ionic Mobile App Framework auf einem Debian 10 Server installieren kannst.
Voraussetzungen
- Ein Server, auf dem Debian 10 läuft.
- Ein Root-Passwort ist auf dem Server konfiguriert.
Getting Started
Zuerst aktualisierst du die Systempakete auf die aktuelle Version, indem du den folgenden Befehl ausführst:
apt-get update -y
Sobald alle Pakete aktualisiert sind, kannst du weitere benötigte Pakete mit dem folgenden Befehl installieren.
apt-get install curl gnupg2 wget -y
Node.js installieren
Als nächstes musst du Node.js auf deinem System installieren. Standardmäßig ist die neueste Version von Node.js nicht im Debian Repository enthalten. Daher musst du das Node Source Repository zu deinem System hinzufügen.
Du kannst das Node Quellcode Repository mit dem folgenden Befehl hinzufügen:
curl -sL https://deb.nodesource.com/setup_14.x | bash -
Sobald das Repository hinzugefügt ist, installiere Node.js mit dem folgenden Befehl:
apt-get install nodejs -y
Nachdem du Node.js installiert hast, überprüfe die Node.js Version mit dem folgenden Befehl:
node --version
Du solltest die folgende Ausgabe sehen:
v14.17.1
Als nächstes musst du auch Cordova auf deinem System installieren. Du kannst es mit dem folgenden Befehl installieren:
npm install -g cordova
Sobald es installiert ist, kannst du mit dem nächsten Schritt fortfahren.
Ionic Framework installieren
Als erstes musst du das Ionic CLI Tool auf deinem Server installieren. Du kannst es mit dem folgenden Befehl installieren:
npm i -g @ionic/cli
Nachdem du ionic installiert hast, überprüfe die ionic Version mit dem folgenden Befehl:
ionic -v
Du solltest die folgende Ausgabe erhalten:
6.16.3
Create a Project with Ionic
Nun kannst du dein erstes Projekt mit dem folgenden Befehl erstellen:
ionic start
Du wirst aufgefordert, das Framework zwischen React oder Angular zu wählen, deinen Projektnamen anzugeben und ein Template auszuwählen, wie unten gezeigt:
Pick a framework! ????

Please select the JavaScript framework to use for your new app. To bypass this prompt next time, supply a value for the
--type option.

? Framework: Angular

Every great app needs a name! ????

Please enter the full name of your app. You can change this at any time. To bypass this prompt next time, supply name,
the first argument to ionic start.

? Project name: myapp

Let's pick the perfect starter template! ????

Starter templates are ready-to-go Ionic apps that come packed with everything you need to build your app. To bypass this
prompt next time, supply template, the second argument to ionic start.

? Starter template: tabs
? Preparing directory ./myapp in 3.69ms
? Downloading and extracting tabs starter in 591.18ms
? Integrate your new app with Capacitor to target native iOS and Android? No

Your Ionic app is ready! Follow these next steps:

- Go to your new project: cd ./myapp
- Run ionic serve within the app directory to see your app in the browser
- Run ionic capacitor add to add a native iOS or Android project using Capacitor
- Generate your app icon and splash screens using cordova-res --skip-config --copy
- Explore the Ionic docs for components, tutorials, and more: https://ion.link/docs
- Building an enterprise app? Ionic has Enterprise Support and Features: https://ion.link/enterprise-edition
Starte die Anwendung
Wechsle nun in das Verzeichnis deines Projekts und starte die Anwendung mit dem folgenden Befehl:
cd myapp
ionic serve --host 0.0.0.0 --port 8100,/p>
Du solltest die folgende Ausgabe erhalten:
> ng run app:serve --host=0.0.0.0 --port=8100
[INFO] Development server running!

       Local: http://localhost:8100
       External: http://216.98.11.73:8100

       Use Ctrl+C to quit this process

[INFO] Browser window opened to http://localhost:8100!
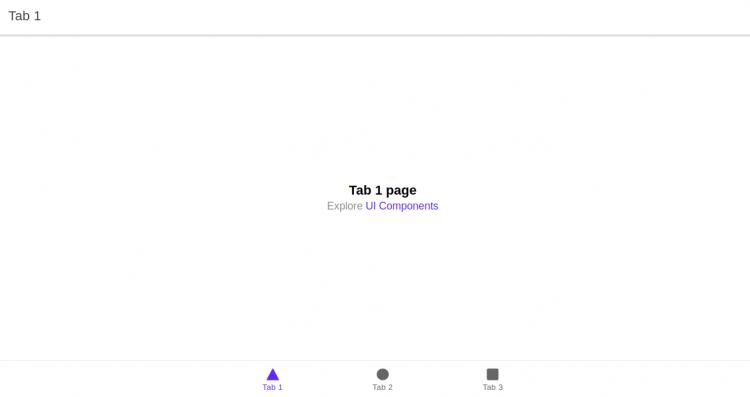
Öffne nun deinen Webbrowser und rufe deine Anwendung über die URL http://your-server-ip:8100 auf. Du solltest deine Ionic-Anwendung auf dem folgenden Bildschirm sehen:
Fazit
Herzlichen Glückwunsch! Du hast das Ionic Framework erfolgreich auf dem Debian 10 Server installiert. Du kannst nun mit der Erstellung deiner mobilen Anwendung unter Verwendung des Ionic Frameworks beginnen.