So installierst du das Netdata Monitoring Tool unter Ubuntu 22.04
Netdata ist eine kostenlose und quelloffene Lösung zur Leistungs- und Zustandsüberwachung für Linux, macOS und FreeBSD. Sie liefert Echtzeitstatistiken und ermöglicht die Überwachung von Cloud-basierten Servern, Containern und deiner gesamten IT-Infrastruktur. Mit Netdata kannst du Systemmetriken wie Speichernutzung, CPU, Bandbreite, Festplattennutzung und vieles mehr in Echtzeit überwachen. Du kannst es auch mit anderen Monitoring-Tools wie Prometheus, Graphite, OpenTSDB, Kafka, Grafana und anderen integrieren.
Diese Anleitung zeigt dir, wie du das Netdata Monitoring Tool auf einem Ubuntu 22.04 Server installierst.
Voraussetzungen
- Ein Server, auf dem Ubuntu 22.04 läuft.
- Ein Root-Passwort ist auf dem Server konfiguriert.
Netdata mit automatisiertem Skript installieren
Die einfachste und leichteste Art, Netdata zu installieren, ist die mit dem automatischen Installationsskript.
Installiere zunächst das Dienstprogramm curl mit dem folgenden Befehl:
apt-get install curl -y
Nach der Installation kannst du das Skript zur automatischen Installation von Netdata herunterladen und mit dem folgenden Befehl ausführen:
bash <(curl -Ss https://my-netdata.io/kickstart.sh)
Sobald Netdata installiert ist, solltest du die folgende Ausgabe sehen:
Sun Sep 11 01:56:23 PM UTC 2022 : INFO: netdata-updater.sh:  Auto-updating has been ENABLED through cron, updater script linked to /etc/cron.daily/netdata-updater

Sun Sep 11 01:56:23 PM UTC 2022 : INFO: netdata-updater.sh:  If the update process fails and you have email notifications set up correctly for cron on this system, you should receive an email notification of the failure.
Sun Sep 11 01:56:23 PM UTC 2022 : INFO: netdata-updater.sh:  Successful updates will not send an email.
Successfully installed the Netdata Agent.

Official documentation can be found online at https://learn.netdata.cloud/docs/.

Looking to monitor all of your infrastructure with Netdata? Check out Netdata Cloud at https://app.netdata.cloud.

Join our community and connect with us on:
  - GitHub: https://github.com/netdata/netdata/discussions
  - Discord: https://discord.gg/5ygS846fR6
  - Our community forums: https://community.netdata.cloud/
Netdata aus dem Ubuntu-Repository installieren
Netdata ist standardmäßig im Standard-Repository von Ubuntu 22.04 verfügbar. Du kannst es installieren, indem du einfach den folgenden Befehl ausführst:
apt-get install netdata -y
Sobald Netdata installiert ist, starte den Netdata-Dienst mit dem folgenden Befehl:
systemctl start netdata
Du kannst den Status von Netdata mit dem folgenden Befehl überprüfen:
systemctl status netdata
Du solltest die folgende Ausgabe erhalten:
? netdata.service - Real time performance monitoring
     Loaded: loaded (/lib/systemd/system/netdata.service; enabled; vendor preset: enabled)
     Active: active (running) since Sun 2022-09-11 13:58:11 UTC; 4s ago
   Main PID: 85446 (netdata)
      Tasks: 64 (limit: 4579)
     Memory: 162.4M
        CPU: 2.653s
     CGroup: /system.slice/netdata.service
             ??85446 /usr/sbin/netdata -D -P /var/run/netdata/netdata.pid
             ??85448 /usr/sbin/netdata --special-spawn-server
             ??85610 bash /usr/libexec/netdata/plugins.d/tc-qos-helper.sh 1
             ??85632 /usr/bin/python3 /usr/libexec/netdata/plugins.d/python.d.plugin 1
             ??85635 /usr/libexec/netdata/plugins.d/apps.plugin 1
             ??85637 /usr/libexec/netdata/plugins.d/nfacct.plugin 1
             ??85638 /usr/libexec/netdata/plugins.d/go.d.plugin 1
             ??85640 /usr/libexec/netdata/plugins.d/ebpf.plugin 1

Sep 11 13:58:11 ubuntu2204 systemd[1]: Started Real time performance monitoring.
Sep 11 13:58:11 ubuntu2204 netdata[85446]: CONFIG: cannot load cloud config '/var/lib/netdata/cloud.d/cloud.conf'. Running with internal defa>
Sep 11 13:58:11 ubuntu2204 netdata[85446]: 2022-09-11 13:58:11: netdata INFO  : MAIN : CONFIG: cannot load cloud config '/var/lib/netdata/clo>
Sep 11 13:58:13 ubuntu2204 ebpf.plugin[85640]: Does not have a configuration file inside `/etc/netdata/ebpf.d.conf. It will try to load stock>
Sep 11 13:58:13 ubuntu2204 ebpf.plugin[85640]: Name resolution is disabled, collector will not parser "hostnames" list.
Sep 11 13:58:13 ubuntu2204 ebpf.plugin[85640]: The network value of CIDR 127.0.0.1/8 was updated for 127.0.0.0 .
Sep 11 13:58:13 ubuntu2204 ebpf.plugin[85640]: Cannot read process groups configuration file '/etc/netdata/apps_groups.conf'. Will try '/usr/>
Zu diesem Zeitpunkt ist Netdata installiert und lauscht auf Port 19999. Du kannst das mit dem folgenden Befehl überprüfen:
ss -antpl | grep 19999
Du solltest die folgende Ausgabe erhalten:
LISTEN 0      4096         0.0.0.0:19999      0.0.0.0:*    users:(("netdata",pid=85446,fd=5))
LISTEN 0      4096            [::]:19999         [::]:*    users:(("netdata",pid=85446,fd=6))
Wenn du fertig bist, kannst du mit dem nächsten Schritt fortfahren.
Zugriff auf die Netdata-Weboberfläche
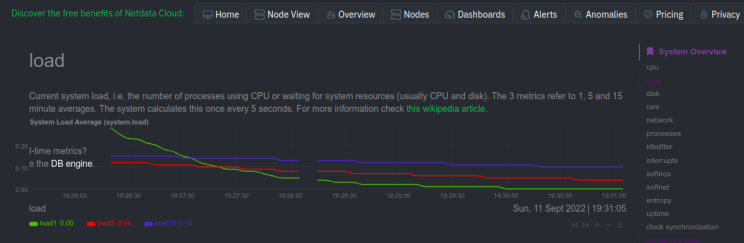
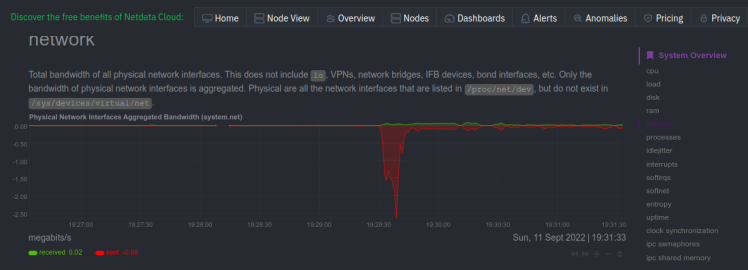
Öffne nun deinen Webbrowser und rufe die Netdata-Weboberfläche über die URL http://your-server-ip:19999 auf. Du solltest das Netdata Webinterface auf dem folgenden Bildschirm sehen:

RAM

Laden
Netzwerk
Uptime

Fazit
Glückwunsch! Du hast Netdata erfolgreich auf dem Ubuntu 22.04 Server installiert. Jetzt kannst du den Netdata-Agenten auf dem Client-Rechner installieren und mit der Überwachung der Systemressourcen über das Netdata-Web-Dashboard beginnen. Wenn du noch Fragen hast, kannst du dich gerne an mich wenden.