Virtuelle Benutzer und Domains Mit Postfix, Courier Und MySQL (Ubuntu 7.10)
10 Installiere Razor, Pyzor Und DCC Und Konfiguriere SpamAssassin
Razor, Pyzor und DCC sind Spamfilter, die ein gemeinschaftliches Filternetzwerk verwenden. Um sie zu installieren, lass Folgendes laufen
apt-get install razor pyzor dcc-client
Nun müssen wir SpamAssassin mitteilen, diese drei Programme zu verwenden. Bearbeite /etc/spamassassin/local.cf und füge folgende Zeilen hinzu:
vi /etc/spamassassin/local.cf
[...] #dcc use_dcc 1 dcc_path /usr/bin/dccproc #pyzor use_pyzor 1 pyzor_path /usr/bin/pyzor #razor use_razor2 1 razor_config /etc/razor/razor-agent.conf #bayes use_bayes 1 use_bayes_rules 1 bayes_auto_learn 1 |
Dann müssen wir den DCC plugin in SpamAssassin freischalten. Öffne /etc/spamassassin/v310.pre und aktiviere die loadplugin Mail::SpamAssassin::Plugin::DCC Zeile:
vi /etc/spamassassin/v310.pre
# This is the right place to customize your installation of SpamAssassin. # # See 'perldoc Mail::SpamAssassin::Conf' for details of what can be # tweaked. # # This file was installed during the installation of SpamAssassin 3.1.0, # and contains plugin loading commands for the new plugins added in that # release. It will not be overwritten during future SpamAssassin installs, # so you can modify it to enable some disabled-by-default plugins below, # if you so wish. # # There are now multiple files read to enable plugins in the # /etc/mail/spamassassin directory; previously only one, "init.pre" was # read. Now both "init.pre", "v310.pre", and any other files ending in # ".pre" will be read. As future releases are made, new plugins will be # added to new files, named according to the release they're added in. ########################################################################### # DCC - perform DCC message checks. # # DCC is disabled here because it is not open source. See the DCC # license for more details. # loadplugin Mail::SpamAssassin::Plugin::DCC # Pyzor - perform Pyzor message checks. # loadplugin Mail::SpamAssassin::Plugin::Pyzor # Razor2 - perform Razor2 message checks. # loadplugin Mail::SpamAssassin::Plugin::Razor2 # SpamCop - perform SpamCop message reporting # loadplugin Mail::SpamAssassin::Plugin::SpamCop # AntiVirus - some simple anti-virus checks, this is not a replacement # for an anti-virus filter like Clam AntiVirus # #loadplugin Mail::SpamAssassin::Plugin::AntiVirus # AWL - do auto-whitelist checks # loadplugin Mail::SpamAssassin::Plugin::AWL # AutoLearnThreshold - threshold-based discriminator for Bayes auto-learning # loadplugin Mail::SpamAssassin::Plugin::AutoLearnThreshold # TextCat - language guesser # #loadplugin Mail::SpamAssassin::Plugin::TextCat # AccessDB - lookup from-addresses in access database # #loadplugin Mail::SpamAssassin::Plugin::AccessDB # WhitelistSubject - Whitelist/Blacklist certain subject regular expressions # loadplugin Mail::SpamAssassin::Plugin::WhiteListSubject ########################################################################### # experimental plugins # DomainKeys - perform DomainKeys verification # # External modules required for use, see INSTALL for more information. # Note that this may be redundant if you also plan to use the DKIM plugin. # #loadplugin Mail::SpamAssassin::Plugin::DomainKeys # MIMEHeader - apply regexp rules against MIME headers in the message # loadplugin Mail::SpamAssassin::Plugin::MIMEHeader # ReplaceTags # loadplugin Mail::SpamAssassin::Plugin::ReplaceTags |
Du kannst Deine SpamAssassin Konfiguration überprüfen indem Du Folgendes ausführst:
spamassassin –lint
Es sollte keine Fehler anzeigen.
Starte amavisd-new danach neu:
/etc/init.d/amavis restart
11 Quota Überschreitungsmeldung
Wenn Du Meldungen bezüglich aller E-Mail-Konten erhalten möchtest, die über Quota sind, dann führe Folgendes aus:
cd /usr/local/sbin/
wget http://puuhis.net/vhcs/quota.txt
mv quota.txt quota_notify
chmod 755 quota_notify
Öffne /usr/local/sbin/quota_notify und bearbeite die Variablen am Anfang. Weiter unten in der Datei (gegen Ende hin) gibt es zwei Zeilen, denen Du ein % Zeichen anhängen solltest:
vi /usr/local/sbin/quota_notify
[...]
my $POSTFIX_CF = "/etc/postfix/main.cf";
my $MAILPROG = "/usr/sbin/sendmail -t";
my $WARNPERCENT = 80;
my @POSTMASTERS = ('postmaster@yourdomain.tld');
my $CONAME = 'My Company';
my $COADDR = 'postmaster@yourdomain.tld';
my $SUADDR = 'postmaster@yourdomain.tld';
my $MAIL_REPORT = 1;
my $MAIL_WARNING = 1;
[...]
           print "Subject: WARNING: Your mailbox is $lusers{$luser}% full.n";
[...]
           print "Your mailbox: $luser is $lusers{$luser}% full.nn";
[...]
|
Lass Folgendes laufen
crontab -e
um einen Cron Job für dieses Skript zu erstellen:
0 0 * * * /usr/local/sbin/quota_notify &> /dev/null |
12 Teste Postfix
Um zu sehen, ob Postfix bereit für SMTP-AUTH und TLS ist, führe Folgendes aus
telnet localhost 25
Nachdem Du die Verbindung zu Deinem Postfix Mail Server eingerichtet hast, gib dies ein
ehlo localhost
Wenn Du die Zeile
250-STARTTLS
und die Zeile
250-AUTH LOGIN PLAIN
siehst, dann ist alles in bester Ordnung:
root@server1:~# telnet localhost 25
Trying 127.0.0.1…
Connected to localhost.localdomain.
Escape character is ‚^]‘.
220 server1.example.com ESMTP Postfix (Ubuntu)
ehlo localhost
250-server1.example.com
250-PIPELINING
250-SIZE 10240000
250-VRFY
250-ETRN
250-STARTTLS
250-AUTH PLAIN LOGIN
250-AUTH=PLAIN LOGIN
250-ENHANCEDSTATUSCODES
250-8BITMIME
250 DSN
quit
221 2.0.0 Bye
Connection closed by foreign host.
root@server1:~#
Gib ein
quit
um zur Kommandozeile des Systmes zurückzukehren.
13 Die Datenbank füllen Und testen
Um die Datenbank zu füllen, kannst Du die MySQL Kommandozeile verwenden:
mysql -u root -p
USE mail;
Du musst wenigstens Einträge in den Tabellen domains und users erstellen:
INSERT INTO `domains` (`domain`) VALUES (‚example.com‘);
INSERT INTO `users` (`email`, `password`, `quota`) VALUES (’sales@example.com‘, ENCRYPT(’secret‘), 10485760);
(Bitte pass auf, dass Du den ENCRYPT Syntax im zweiten INSERT Statement verwendest, um das Passwort zu verschlüsseln!)
Wenn Du Einträge in den anderen zwei Tabellen vornehmen möchtest, würde dies so aussehen:
INSERT INTO `forwardings` (`source`, `destination`) VALUES (‚info@example.com‘, ’sales@example.com‘);
INSERT INTO `transport` (`domain`, `transport`) VALUES (‚example.com‘, ’smtp:mail.example.com‘);
Um die MySQL Kommandozeile zu verlassen, gib ein
quit;
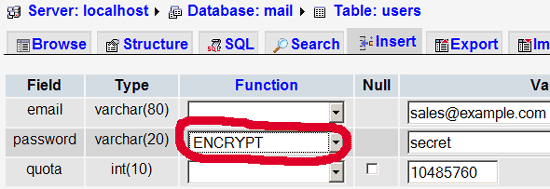
Für die Meisten ist es einfacher wenn sie ein grafisches Front-end zu MySQL haben; daher kannst Du auch phpMyAdmin (in diesem Beispiel unter http://192.168.0.100/phpmyadmin/ oder http://server1.example.com/phpmyadmin/) verwenden die mail Datenbank zu verwalten. Nochmal, wenn Du einen Benutzer einrichtest, vergewissere Dich, dass Du die ENCRYPT Funktion zum Verschlüsseln des Passwortes verwendest:
Ich denke nicht, dass ich die domains und users Tabelle weiter erklären muss.
Die forwardings Tabelle kann Einträge wie die folgenden haben:
| source | destination | |
| info@example.com | sales@example.com | Redirects emails for info@example.com to sales@example.com |
| @example.com | thomas@example.com | Creates a Catch-All account for thomas@example.com. All emails to example.com will arrive at thomas@example.com, except those that exist in the users table (i.e., if sales@example.com exists in the users table, mails to sales@example.com will still arrive at sales@example.com). |
| @example.com | @anotherdomain.tld | This redirects all emails to example.com to the same user at anotherdomain.tld. E.g., emails to thomas@example.com will be forwarded to thomas@anotherdomain.tld. |
| info@example.com | sales@example.com, billing@anotherdomain.tld | Forward emails for info@example.com to two or more email addresses. All listed email addresses under destination receive a copy of the email. |
Die transporttTabelle kann folgende Einträge haben:
| domain | transport | |
| example.com | : | Delivers emails for example.com locally. This is as if this record would not exist in this table at all. |
| example.com | smtp:mail.anotherdomain.tld | Delivers all emails for example.com via smtp to the server mail.anotherdomain.com. |
| example.com | smtp:mail.anotherdomain.tld:2025 | Delivers all emails for example.com via smtp to the server mail.anotherdomain.com, but on port 2025, not 25 which is the default port for smtp. |
| example.com | smtp:[1.2.3.4] smtp:[1.2.3.4]:2025 smtp:[mail.anotherdomain.tld] |
The square brackets prevent Postfix from doing lookups of the MX DNS record for the address in square brackets. Makes sense for IP addresses. |
| .example.com | smtp:mail.anotherdomain.tld | Mail for any subdomain of example.com is delivered to mail.anotherdomain.tld. |
| * | smtp:mail.anotherdomain.tld | All emails are delivered to mail.anotherdomain.tld. |
| joe@example.com | smtp:mail.anotherdomain.tld | Emails for joe@example.com are delivered to mail.anotherdomain.tld. |
Siehe
man transport
für mehr Informationen.
Bitte denke daran, dass die Anordnung der Einträge in der transport Tabelle wichtig ist! Die Einträge schließen sich von oben nach unten an.
Wichtig: Postfix verwendet einen Caching Mechanism für den Transport, daher kann es eine Weile dauern, bis Deine Änderungen in der transport Tabelle übernommen werden. Wenn Du möchtest, dass sie sofort übernommen werden, lass Folgendes laufen
postfix reload
nachdem Du Deine Änderungen in der transport Tabelle vorgenommen hast.
14 References
- Tutorial: ISP-style Email Service with Debian-Sarge and Postfix 2.1: http://workaround.org/articles/ispmail-sarge/
- Postfix + Quota: http://vhcs.net/new/modules/newbb/viewtopic.php?topic_id=3496&forum=17
- Mail Passwords Encrypted using saslauthd: http://www.syscp.de/docs/public/contrib/cryptedmailpws
15 Links
- Postfix MTA: http://www.postfix.org/
- Postfix Quota Patch: http://web.onda.com.br/nadal/
- phpMyAdmin: http://www.phpmyadmin.net/
- Ubuntu: http://www.ubuntu.com/