Plex Media Server unter Ubuntu 20.04 installieren
Plex ist ein leistungsstarker und funktionsreicher Medien-Streaming-Server, mit dem Sie Ihre Videos, Musik und Fotos organisieren und an entfernte Geräte von überall her streamen können. Er unterstützt viele Betriebssysteme, darunter Linux, Windows, FreeBSD, MacOS und viele andere. Sie können auf die auf dem Plex Server gespeicherten Medien von Smart TV, Smartphone und Streaming-Box mit dem Plex Media Client zugreifen.
Plex hat eine Menge Funktionen, von denen einige unten aufgeführt sind:
- Live-Fernsehen und DVR.
- Mobile Synchronisierung.
- Wolken-Synchronisierung.
- Premium-Musikfunktionen.
- Premium-Fotobibliotheken.
- Hardware-beschleunigtes Streaming.
- Jugendschutz.
- Kamera-Upload.
- Bandbreiten- und Transkodierungsbeschränkungen.
In diesem Tutorial werden wir erklären, wie man Plex-Medienserver mit Nginx als Reverse-Proxy auf einem Ubuntu 20.04-Server installiert.
Voraussetzungen
- Ein Server, auf dem Ubuntu 20.04 läuft.
- Ein Root-Passwort wird konfiguriert.
Erste Schritte
Zuerst müssen Sie Ihre Systempakete auf die neueste Version aktualisieren. Sie können sie mit dem folgenden Befehl aktualisieren:
apt-get update -y
Sobald Ihre Pakete aktualisiert sind, können Sie mit dem nächsten Schritt fortfahren.
Plex-Medienserver installieren
Zuerst müssen Sie die neueste Version des Plex-Medienservers von der offiziellen Plex-Website herunterladen. Sie können sie mit dem folgenden Befehl herunterladen:
wget https://downloads.plex.tv/plex-media-server-new/1.20.1.3252-a78fef9a9/debian/plexmediaserver_1.20.1.3252-a78fef9a9_amd64.deb
Sobald das Plex-Medienserver-Paket heruntergeladen ist, können Sie es mit dem folgenden Befehl installieren:
dpkg -i plexmediaserver_1.20.1.3252-a78fef9a9_amd64.deb
Sobald der Plex-Medienserver installiert ist, starten Sie den Plex-Dienst und aktivieren ihn beim Systemneustart mit dem folgenden Befehl:
systemctl start plexmediaserver
systemctl enable plexmediaserver
Als nächstes können Sie den Status des Plex-Dienstes mit dem folgenden Befehl überprüfen:
systemctl status plexmediaserver
Sie sollten die folgende Ausgabe sehen:
? plexmediaserver.service - Plex Media Server
     Loaded: loaded (/lib/systemd/system/plexmediaserver.service; enabled; vendor preset: enabled)
     Active: active (running) since Sat 2020-09-05 06:48:06 UTC; 17s ago
    Process: 38369 ExecStartPre=/bin/sh -c /usr/bin/test -d "${PLEX_MEDIA_SERVER_APPLICATION_SUPPORT_DIR}" || /bin/mkdir -p "${PLEX_MEDIA_SERV>
   Main PID: 38371 (Plex Media Serv)
      Tasks: 120 (limit: 2353)
     Memory: 215.0M
     CGroup: /system.slice/plexmediaserver.service
             ??38371 /usr/lib/plexmediaserver/Plex Media Server
             ??38405 Plex Plug-in [com.plexapp.system] /usr/lib/plexmediaserver/Resources/Plug-ins-a78fef9a9/Framework.bundle/Contents/Resourc>
             ??38451 /usr/lib/plexmediaserver/Plex Tuner Service /usr/lib/plexmediaserver/Resources/Tuner/Private /usr/lib/plexmediaserver/Res>
             ??38474 Plex Plug-in [com.plexapp.agents.plexthememusic] /usr/lib/plexmediaserver/Resources/Plug-ins-a78fef9a9/Framework.bundle/C>
             ??38477 Plex Plug-in [com.plexapp.agents.themoviedb] /usr/lib/plexmediaserver/Resources/Plug-ins-a78fef9a9/Framework.bundle/Conte>
             ??38533 Plex Plug-in [org.musicbrainz.agents.music] /usr/lib/plexmediaserver/Resources/Plug-ins-a78fef9a9/Framework.bundle/Conten>
             ??38544 Plex Plug-in [com.plexapp.agents.thetvdb] /usr/lib/plexmediaserver/Resources/Plug-ins-a78fef9a9/Framework.bundle/Contents>
             ??38638 Plex Plug-in [com.plexapp.agents.opensubtitles] /usr/lib/plexmediaserver/Resources/Plug-ins-a78fef9a9/Framework.bundle/Co>
             ??38710 Plex Plug-in [com.plexapp.agents.fanarttv] /usr/lib/plexmediaserver/Resources/Plug-ins-a78fef9a9/Framework.bundle/Content>

Sep 05 06:48:06 ubuntu2004 systemd[1]: Starting Plex Media Server...
Sep 05 06:48:06 ubuntu2004 systemd[1]: Started Plex Media Server.
An diesem Punkt wird der Plex Media Server gestartet und hört auf Port 32400. Sie können dies mit dem folgenden Befehl überprüfen:
ss -lnpt | grep Plex
Sie sollten die folgende Ausgabe sehen:
LISTEN    0         128              127.0.0.1:39851            0.0.0.0:*        users:(("Plex Script Hos",pid=38739,fd=4))
LISTEN    0         128              127.0.0.1:46031            0.0.0.0:*        users:(("Plex Script Hos",pid=38779,fd=4))
LISTEN    0         1024             127.0.0.1:32401            0.0.0.0:*        users:(("Plex Media Serv",pid=38371,fd=61))
LISTEN    0         128              127.0.0.1:44661            0.0.0.0:*        users:(("Plex Script Hos",pid=38533,fd=4))
LISTEN    0         128              127.0.0.1:32600            0.0.0.0:*        users:(("Plex Tuner Serv",pid=38451,fd=13))
LISTEN    0         128              127.0.0.1:36637            0.0.0.0:*        users:(("Plex Script Hos",pid=38544,fd=4))
LISTEN    0         128              127.0.0.1:42973            0.0.0.0:*        users:(("Plex Script Hos",pid=38405,fd=10))
LISTEN    0         128              127.0.0.1:38467            0.0.0.0:*        users:(("Plex Script Hos",pid=38824,fd=4))
LISTEN    0         128              127.0.0.1:40035            0.0.0.0:*        users:(("Plex Script Hos",pid=38477,fd=4))
LISTEN    0         1024                     *:32400                  *:*        users:(("Plex Media Serv",pid=38371,fd=60))
Sobald Sie fertig sind, können Sie mit dem nächsten Schritt fortfahren.
Plex-Medienserver-Repository aktivieren
Standardmäßig ist das Plex-Medienserver-Repository in der APT deaktiviert. Es wird daher empfohlen, es zu aktivieren, damit Sie den Plex-Medienserver mit dem APT-Befehl aktualisieren können. Sie können es aktivieren, indem Sie die folgende Datei bearbeiten:
nano /etc/apt/sources.list.d/plexmediaserver.list
Kommentieren Sie die folgende Zeile aus:
deb https://downloads.plex.tv/repo/deb/ public main
Speichern und schließen Sie die Datei und fügen Sie dann den Plex GPG Schlüssel mit dem folgenden Befehl hinzu:
wget -q https://downloads.plex.tv/plex-keys/PlexSign.key -O - | apt-key add -
Aktualisieren Sie nun das Repository mit dem folgenden Befehl, um die Änderungen zu übernehmen:
apt-get update -y
Sobald das Repository aktualisiert ist, können Sie mit dem nächsten Schritt fortfahren.
Konfigurieren Sie Nginx für Plexus
Als nächstes wird empfohlen, Nginx als Reverse-Proxy für Plex zu installieren und zu konfigurieren. So können Sie über den Port 80 auf den Plex-Medienserver zugreifen.
Installieren Sie zuerst den Nginx-Webserver mit dem folgenden Befehl:
apt-get install nginx -y
Sobald der Nginx-Webserver installiert ist, erstellen Sie eine neue Nginx-Konfigurationsdatei für den virtuellen Host mit folgendem Befehl:
nano /etc/nginx/sites-available/plex.conf
Fügen Sie die folgenden Zeilen hinzu:
upstream plex_backend {
        server 127.0.0.1:32400;
        keepalive 32;
}

server {
        listen 80;
        server_name plex.example.com;

        send_timeout 100m; #Some players don't reopen a socket and playback stops totally instead of resuming after an extended pause (e.g. Ch$

       	#Plex has A LOT of javascript, xml and html. This helps a lot, but if it causes playback issues with devices turn it off. (Haven't enc$
        gzip on;
        gzip_vary on;
        gzip_min_length 1000;
        gzip_proxied any;
        gzip_types text/plain text/css text/xml application/xml text/javascript application/x-javascript image/svg+xml;
        gzip_disable "MSIE [1-6]\.";

       	#Nginx default client_max_body_size is 1MB, which breaks Camera Upload feature from the phones.
       	#Increasing the limit fixes the issue. Anyhow, if 4K videos are expected to be uploaded, the size might need to be increased even more
        client_max_body_size 100M;

       	#Forward real ip and host to Plex
        proxy_set_header Host $host;
        proxy_set_header X-Real-IP $remote_addr;
        proxy_set_header X-Forwarded-For $proxy_add_x_forwarded_for;
        proxy_set_header X-Forwarded-Proto $scheme;
        proxy_set_header Sec-WebSocket-Extensions $http_sec_websocket_extensions;
        proxy_set_header Sec-WebSocket-Key $http_sec_websocket_key;
        proxy_set_header Sec-WebSocket-Version $http_sec_websocket_version;
       	#Websockets
        proxy_http_version 1.1;
        proxy_set_header Upgrade $http_upgrade;
        proxy_set_header Connection "Upgrade";

       	#Buffering off send to the client as soon as the data is received from Plex.
        proxy_redirect off;
        proxy_buffering off;

        location / {
                proxy_pass http://plex_backend;
        }
}
Speichern und schließen Sie die Datei und überprüfen Sie dann Nginx mit dem folgenden Befehl auf Syntaxfehler:
nginx -t
Sie sollten die folgende Ausgabe erhalten:
nginx: the configuration file /etc/nginx/nginx.conf syntax is ok
nginx: configuration file /etc/nginx/nginx.conf test is successful
Als Nächstes aktivieren Sie die Konfigurationsdatei des virtuellen Nginx-Hosts mit dem folgenden Befehl:
ln -s nano /etc/nginx/sites-available/plex.conf /etc/nginx/sites-enabled/
Starten Sie abschließend den Nginx-Dienst neu, um die Konfigurationsänderungen zu übernehmen:
systemctl restart nginx
Sie können nun den Nginx-Status mit dem folgenden Befehl überprüfen:
systemctl status nginx
Sie sollten die folgende Ausgabe erhalten:
? nginx.service - A high performance web server and a reverse proxy server
     Loaded: loaded (/lib/systemd/system/nginx.service; enabled; vendor preset: enabled)
     Active: active (running) since Sat 2020-09-05 06:57:20 UTC; 1min 47s ago
       Docs: man:nginx(8)
    Process: 40059 ExecStartPre=/usr/sbin/nginx -t -q -g daemon on; master_process on; (code=exited, status=0/SUCCESS)
    Process: 40070 ExecStart=/usr/sbin/nginx -g daemon on; master_process on; (code=exited, status=0/SUCCESS)
   Main PID: 40072 (nginx)
      Tasks: 3 (limit: 2353)
     Memory: 3.6M
     CGroup: /system.slice/nginx.service
             ??40072 nginx: master process /usr/sbin/nginx -g daemon on; master_process on;
             ??40073 nginx: worker process
             ??40074 nginx: worker process

Sep 05 06:57:20 ubuntu2004 systemd[1]: Starting A high performance web server and a reverse proxy server...
Sep 05 06:57:20 ubuntu2004 systemd[1]: Started A high performance web server and a reverse proxy server.
Sobald Sie fertig sind, können Sie mit dem nächsten Schritt fortfahren.
Zugriff auf Plex Media Server
An diesem Punkt wird der Plex-Mediendienst installiert und mit Nginx konfiguriert. Öffnen Sie nun Ihren Webbrowser und greifen Sie über die URL http://plex.example.com auf den Plex-Medienserver zu. Sie sollten die folgende Seite sehen:
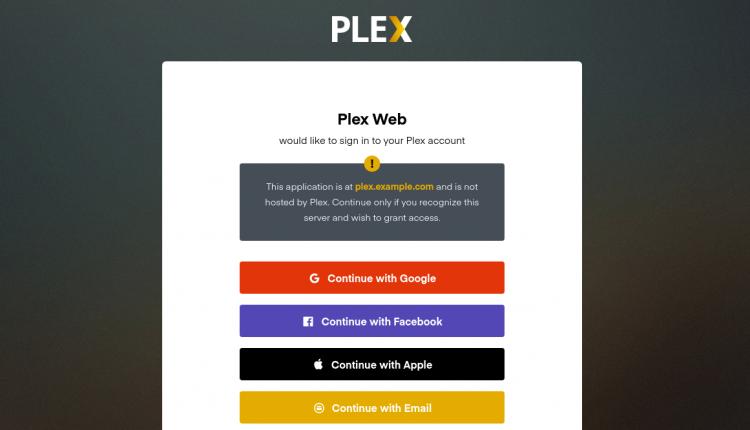
Melden Sie sich nun mit Ihrem Google- oder Facebook-Konto an. Auf der folgenden Seite sollten Sie das Dashboard des Plex-Medienservers sehen:

Sicherer Plex mit Let’s Encrypt SSL
Als nächstes wird empfohlen, Plexus mit Let’s Encrypt SSL zu sichern. Zuerst müssen Sie den Certbot-Client Let’s Encrypt auf Ihrem Server installieren, um SSL zu installieren und zu verwalten. Sie können ihn mit dem folgenden Befehl installieren:
apt-get install python3-certbot-nginx -y
Nach der Installation von Certbot führen Sie den folgenden Befehl aus, um Let’s Encrypt SSL auf Ihrer Domain zu installieren:
certbot --nginx -d plex.example.com
Sie werden gebeten, eine gültige E-Mail-Adresse anzugeben und den unten aufgeführten Bedingungen zuzustimmen:
Saving debug log to /var/log/letsencrypt/letsencrypt.log
Plugins selected: Authenticator nginx, Installer nginx
Enter email address (used for urgent renewal and security notices) (Enter 'c' to
cancel): hitjethva@gmail.com

- - - - - - - - - - - - - - - - - - - - - - - - - - - - - - - - - - - - - - - -
Please read the Terms of Service at
https://letsencrypt.org/documents/LE-SA-v1.2-November-15-2017.pdf. You must
agree in order to register with the ACME server at
https://acme-v02.api.letsencrypt.org/directory
- - - - - - - - - - - - - - - - - - - - - - - - - - - - - - - - - - - - - - - -
(A)gree/(C)ancel: A

- - - - - - - - - - - - - - - - - - - - - - - - - - - - - - - - - - - - - - - -
Would you be willing to share your email address with the Electronic Frontier
Foundation, a founding partner of the Let's Encrypt project and the non-profit
organization that develops Certbot? We'd like to send you email about our work
encrypting the web, EFF news, campaigns, and ways to support digital freedom.
- - - - - - - - - - - - - - - - - - - - - - - - - - - - - - - - - - - - - - - -
(Y)es/(N)o: Y
Obtaining a new certificate
Performing the following challenges:
http-01 challenge for plex.example.com
Waiting for verification...
Cleaning up challenges
Deploying Certificate to VirtualHost /etc/nginx/sites-enabled/plex.conf
Als nächstes wählen Sie, ob HTTP-Verkehr wie unten gezeigt zu HTTPS umgeleitet werden soll oder nicht:
- - - - - - - - - - - - - - - - - - - - - - - - - - - - - - - - - - - - - - - -
1: No redirect - Make no further changes to the webserver configuration.
2: Redirect - Make all requests redirect to secure HTTPS access. Choose this for
new sites, or if you're confident your site works on HTTPS. You can undo this
change by editing your web server's configuration.
- - - - - - - - - - - - - - - - - - - - - - - - - - - - - - - - - - - - - - - -
Select the appropriate number [1-2] then [enter] (press 'c' to cancel): 2
Geben Sie 2 ein und drücken Sie Enter, um die Installation abzuschließen. Sie sollten die folgende Ausgabe sehen:
Redirecting all traffic on port 80 to ssl in /etc/nginx/sites-enabled/plex.conf

- - - - - - - - - - - - - - - - - - - - - - - - - - - - - - - - - - - - - - - -
Congratulations! You have successfully enabled https://plex.example.com

You should test your configuration at:
https://www.ssllabs.com/ssltest/analyze.html?d=plex.example.com
- - - - - - - - - - - - - - - - - - - - - - - - - - - - - - - - - - - - - - - -

IMPORTANT NOTES:
 - Congratulations! Your certificate and chain have been saved at:
   /etc/letsencrypt/live/plex.example.com/fullchain.pem
   Your key file has been saved at:
   /etc/letsencrypt/live/plex.example.com/privkey.pem
   Your cert will expire on 2020-10-30. To obtain a new or tweaked
   version of this certificate in the future, simply run certbot again
   with the "certonly" option. To non-interactively renew *all* of
   your certificates, run "certbot renew"
 - Your account credentials have been saved in your Certbot
   configuration directory at /etc/letsencrypt. You should make a
   secure backup of this folder now. This configuration directory will
   also contain certificates and private keys obtained by Certbot so
   making regular backups of this folder is ideal.
 - If you like Certbot, please consider supporting our work by:

   Donating to ISRG / Let's Encrypt:   https://letsencrypt.org/donate
   Donating to EFF:                    https://eff.org/donate-le

 - We were unable to subscribe you the EFF mailing list because your
   e-mail address appears to be invalid. You can try again later by
   visiting https://act.eff.org.
Sie können nun sicher auf Ihren Plex-Medienserver über die URL https://plex.example.com zugreifen.
Schlussfolgerung
Herzlichen Glückwunsch! Sie haben den Plex-Medienserver mit Nginx als Reverse-Proxy auf dem Ubuntu 20.04-Server erfolgreich installiert. Sie können nun Ihre Medien, Musik und Fotos hochladen und über das Smartphone, den Fernseher oder andere Streaming-Boxen darauf zugreifen. Zögern Sie nicht, mich zu fragen, wenn Sie Fragen haben.